BMEEPAGA205
A feladat keretében saját arcképét kell előírt méretűre alakítania, nevét és Neptun-kódját ráírnia, majd az majd az alábbi hivatkozáson beadnia.
In this excercise you have to create a digital self-portrait, label it with your name and Neptun-code, and upload it hrough the link at the bottom of this page.
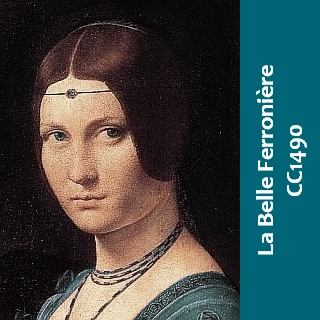
A mintakép egy Leonardo da Vincinek tulajdonított festményen alapul
The sample is a picture probably by Leonardo da Vinci
(La Belle Ferronière ).
1.
Portré
Portrait
Állítsa elő digitális arcképét 240×320 pixel méretű, 16 milliós színterjedelmű képként!
Create your digital self-portrait as a 240×320 pixel, 16M color picture.
Készít(tes)sen vagy keressen elő egy korábbi fényképet, amin megfelelő méretben szerepel az arcképe. Mivel a kép normális esetben nagyobb méretű, mint ami szükséges, le kell csökkenteni a méretét.
Take or find a photo that shows your face in the appropriate size. Since the image is normally larger than necessary, its size should be reduced.
A 16,7 milliós színterjedelem annyit jelent, hogy az egyes képpontok színét vörös, zöld és kék összetevőkből keverjük ki, és az egyes pontok szín-összetevőit a ma tipikus módon 3×8 biten tároljuk, miáltal minden képpont színe 256×256×256 lehetséges értéket vehet föl.
The 16.7 million color range means that the color of each pixel is mixed from red, green, and blue components, and as is typical today, each color component is stored in 8 bits per pixel, which means that each pixel color can take on 256×256×256 possible values.
A következőkben az IrfanView programmal mutatjuk be a lépéseket, ami egy kis méretű, ingyenes képnézegető, és alapszintű képszerkesztő feladatokra is képes.
In the following, we will demonstrate the steps using the IrfanView program, a small freeware image viewer that can also perform basic image editing tasks.
(irfanview.com)
Alternatíva lehet az XnView MP program is, amely kicsit nagyobb méretű, de szintén freeware, szintén használható telepítés nélkül is (akár pendrive-on hordozható), és létezik Mac verziója is.
A suitable alternative could be the XnView MP program, which is larger in size, but is also freeware, and can also be used without installation — and it has Mac version also.
(xnview.com).
Képmagasság
Height
Nyissa meg az
Open the
eredeti képet
original picture
és vágja ki az arcképet tartalmazó részt. Első lépésben javasolt csak a kivágás magasságát beállítani, és négyzetes arányt beállítani, hogy az átméretezés ne okozzon kerekítési hibát.
crop the part containing the face. It is enough to set the height of the range and set a square shape so that the resizing does not cause rounding errors.
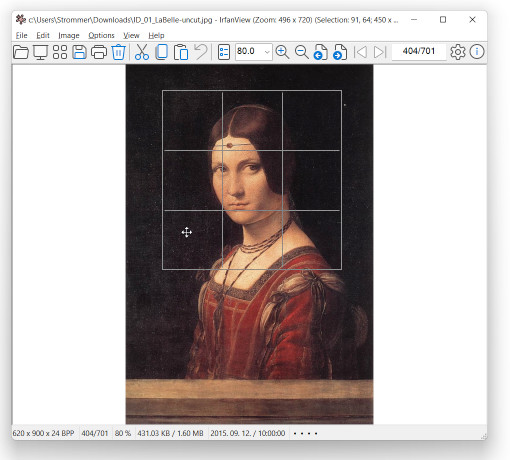
Kattintson a képre, és a gombot nyomva tartva rajzoljon egy téglalapot. Az első kijelölés után a teljes téglalap a jobb egérgombbal, határvonalai a bal egérgombbal mozgathatók, a bal felső sarok koordinátája, valamint a kijelölés mérete az ablak fejlécében látható.
Click on the image and hold down the button to draw a rectangle. After the initial selection, the entire rectangle can be dragged with the right mouse button and its borders with the left mouse button. The coordinate of the upper left corner and the size of the selection are shown in the window header.
Az Edit◢ Crop selection (Szerkesztés◢ Kijelölt rész a kép) parancs (Ctrl+Y) a kijelölt téglalapon kivüli részeket levágja.
The Edit◢ Crop selection command (Ctrl+Y) cuts everything outside of the selection.
Átméretezés
Resize
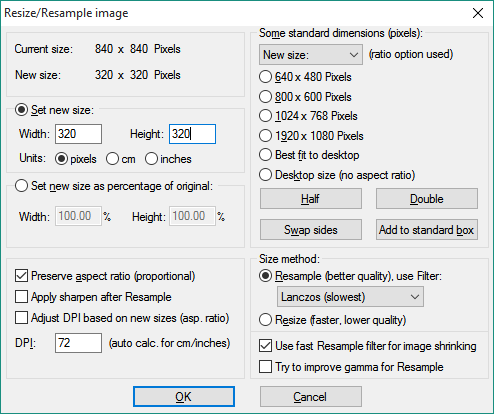
A maradék kép magasságát le kell csökkenteni 320 pixel méretűre.
Ehhez az Image◢ Resize/ Resample (Kép◢ Méretváltoztatás) parancs (Ctrl+R) használható: a Set new size (Új méret) részen adható meg a kívánt magasság – ügyelve persze, hogy a Preserve aspect ratio (Arányos) kapcsoló be legyen kapcsolva.
Use the Image◢ Resize/ Resample command (Ctrl+R) to set the height of the image. Make sure that the Preserve aspect ratio checkbox is checked, otherwise the image would become distorted. In the Set new size area set the Height to 320 pixels.
Képszélesség
Width
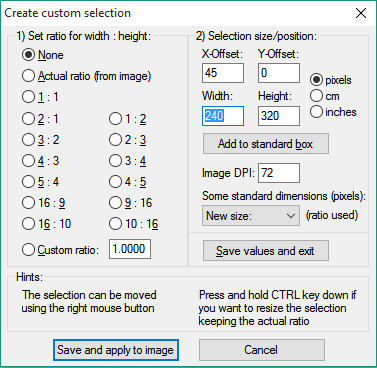
A vízszintes méret pontos vágásához Edit◢ Create custom crop selection (Szerkesztés◢ Speciális kijelölés-készítés) parancs (Shift+C) használható:
— a Set ratio for width : height (Szélesség/magasság oldalarány) részen a ◉ None (Nincs) opció legyen aktív,
— így a Selection size/position rovatban megadható a 240x320 pixel méret.
Use the Edit◢ Create custom crop selection command (Shift+C) to set the size of the image precisely:
— in the Set ratio for width : height area, select ◉ None,
— in the Selection size/position area set the Width to 240 pixels and the Height to 320 pixels.
Alkalmazza a kijelölést a képre, szükség esetén jobb egérgombbal húzza arrébb a kijelölést, végül az előbbi módon az Edit◢ Crop selection (Szerkesztés◢ Kijelölt rész a kép) parancs (Ctrl+Y) segítségével vágja le a fölösleges részt.
Apply the selection to the picture.
If neccessary, move the selection window by clicking and holding down the right mouse button.
Use the Edit◢ Crop selection command (Ctrl+Y) to get rid of the unnecessary part of the image.
2.
Felirat
Caption
Növelje meg a kép méretét jobbra 80 pixellel tetszőleges háttérszínnel (R+G+B érték max. 300, vagy min. 450)!
Az új területre írja rá a nevét és Neptun-kódját fekete vagy (sötét háttér esetén) fehér színű, 16 px méretű, félkövér Candara betűkkel!
Enlarge the picture by 80 pixels on its right side using a background color whose Red+Green+Blue value is less than 300 or greater than 450.
Write your name and Neptun-code in the newly added area in black (on light background) or white (on dark background) using Candara Bold font with 16 pt size.
Más programnál (vagy más gépnél) lehet, hogy más számot kell megadni a kívánt mérethez – ellenőrizze a mintaképet!
In other programs and/or situations you may need to enter a different number for the desired size — check the sample image!
Képméret
Canvas Size
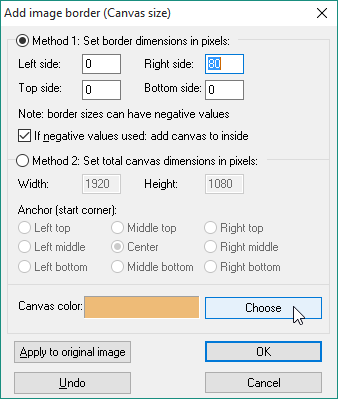
A kép méretének megnövelésére a Image◢ Change canvas size (Kép◢ Színes keret hozzáadása) parancs (Shift+V) használható:
— a Right side rovatba beírható, hogy 80 pixellel nőjön a kép mérete (a többi rovat legyen nulla!),
— a Canvas color területre kattintva kiválasztható vagy megadható a háttérszín (pl. RGB 238-187-119),
— ellenőrizzük a képet (Apply to the original image), végül OK.
Use the Image◢ Change canvas size command (Shift+V) to add a border to the right side of the image:
— set the Right side border to 80 pixels (and set all the others to 0),
— click inside the Canvas color area or on the Choose button and set the background color (e.g. RGB 238-187-119),
— check the appearance by clicking on the Apply to the original image button before you finally click on OK.
Felirat
Add Text
Feliratozás előtt
— el kell forgatni a képet az Image◢ Rotate right (Kép◢ Elforgatás jobbra) paranccsal (R),
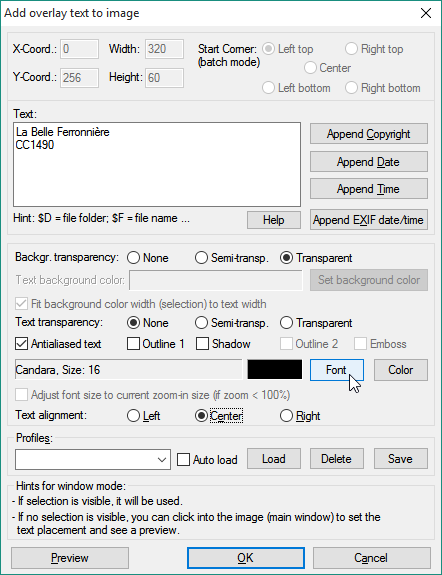
— ki kell jelölni a felirat helyét az Edit◢ Create custom crop selection (Szerkesztés◢ Speciális kijelölés-készítés) paranccsal (Shift+C),
— az X-offset 0, az Y-offset 256, a Width (Szélesség) 320, a Height (Magasság) 60 pixel.
Before adding the text
— use the Image◢ Rotate right command (R) to rotate the image,
— use the Edit◢ Create custom crop selection command (Shift+C) to select the area where the text should be placed,
— set the X-offset to 0, the Y-offset to 256, the Width to 320, the Height to 60 pixels.
Felirat az Edit◢ Insert text (Szerkesztés◢ Szövegbeszúrás) paranccsal (Ctrl+T) illeszthető be.
— a szöveget értelemszerűen a Text (Szöveg) rovatba kell beírni,
— a betűtípusnév gombbal megjelenő panelen adható meg a Candara font, a félkövér stílus, és a 16-os méret,
— a betűtípusnév gombbal megjelenő panelen adható meg a fekete vagy fehér szín,
— és természetesen be kell jelölni a ◉ Center igazítást is,
— az előnézeti kép ellenőrzése után OK.
Use theEdit◢ Insert text command (Ctrl+T) to add the text to the image.
— write your name and Neptun-code (in two rows) into the Text box,
— click on the Font button and select the Candara font, the Bold style, and the 16 pt size,
— click on the Color button and select black or white depending on the color of your background color,
— select the ◉ Center option,
— check the appearance by clicking on the Preview button before you finally click on OK.
A képet ezután vissza lehet forgatni az Image◢ Rotate left (Kép◢ Elforgatás balra) paranccsal (L).
Use the Image◢ Rotate left command (L) to rotate the image back to its original position.
3.
Mentés
Save
Mentse el a képet 90%-os minőségű JPG fájlként!
Save your picture as a 90% quality JPG file. The file name should be your Neptun-code.
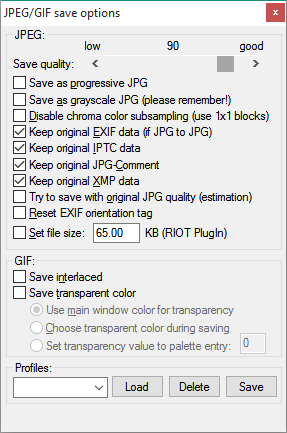
A kép mentéséhez használható a File◢ Save parancs (Ctrl+S)
— érdemes más nevet adni a képnek, így nem írja felül az eredetit,
— célszerű bekapcsolni a panel alján a Show format options dialog kapcsolót,
— javasolt a másodlagos panelen a Save quality rovatban a minőséget 90%-ra állítani.
Use the File◢ Save command (Ctrl+S) to save the file
— change the filename in order to avoid overwriting the original file,
— make sure that the Show format options dialog checkbox at the bottom is checked,
— set the Save quality on the secondary panel to 90%.
Képminőség
Quality
JPEG típusú fájl mentésekor a legtöbb programban beállítható a tömörítés foka, illetve a képminőség. Nagyobb tömörítés értelemszerűen kisebb fájlméretet eredményez, de a kép minősége is csökken – az éles átmenetek körül füstszerű fantomkontúrok jelennek meg.
When saving a JPEG file, most programs allow you to adjust the compression level and image quality. Higher compression will naturally result in a smaller file size, but it will also degrade image quality — smoke-like phantom outlines will appear around sharp contours.
EXIF info
EXIF info
A digitális fényképezőgépek a képfájlba elmentik a fotó készítésének körülményeit (géptípus, blende, fókusz, stb.), egy kis előnézeti képet (thumbnail), és (pl. mobiltelefon esetén) sokszor a GPS koordinátákat is.
Az ilyen képek készítési dátuma (helye) így később is tudható, aminek persze lehet jó és rossz oldala.
Digital cameras (including smartphones) save additional data into the image file (date, time, camera model, lenslength etc.), and create a small preview of the full picture also (thumbnail).
4.
Beadás
Submission
Adja be az igazolványképet az alábbi linken! A fájlnév legyen a Neptunkód.
Submit the picture using the link below.
Beadás
Submission